Best Practices for Collaborative Video Editing Remotely
Due to the recent pandemic COVID-19, schools, libraries & businesses have had to switch workflows to remote because of social distancing measures implemented. Getting group video projects done can be stressful, but even more stressful amid the new remote work norms. From coordinating the remote editing process to collaborative editing apps, here are a few best practices & tips to navigating the challenges of managing a video editing project remotely.
Cloud collaboration tool in Adobe Team Projects
Project files are stored and saved in the Creative Cloud, so you can revert and sync project files across multiple workstations. All of the editing are synced between machines using a file sharing service like Creative Cloud, Dropbox, or Box. This is very useful for class projects. Teams can see who’s online and resolve editing conflicts in real-time. It’s like working in the same editing room, from hundreds of miles away. The Team’s feature is available as a subscription service in Adobe and definitely worth it if you often collaborate remotely.
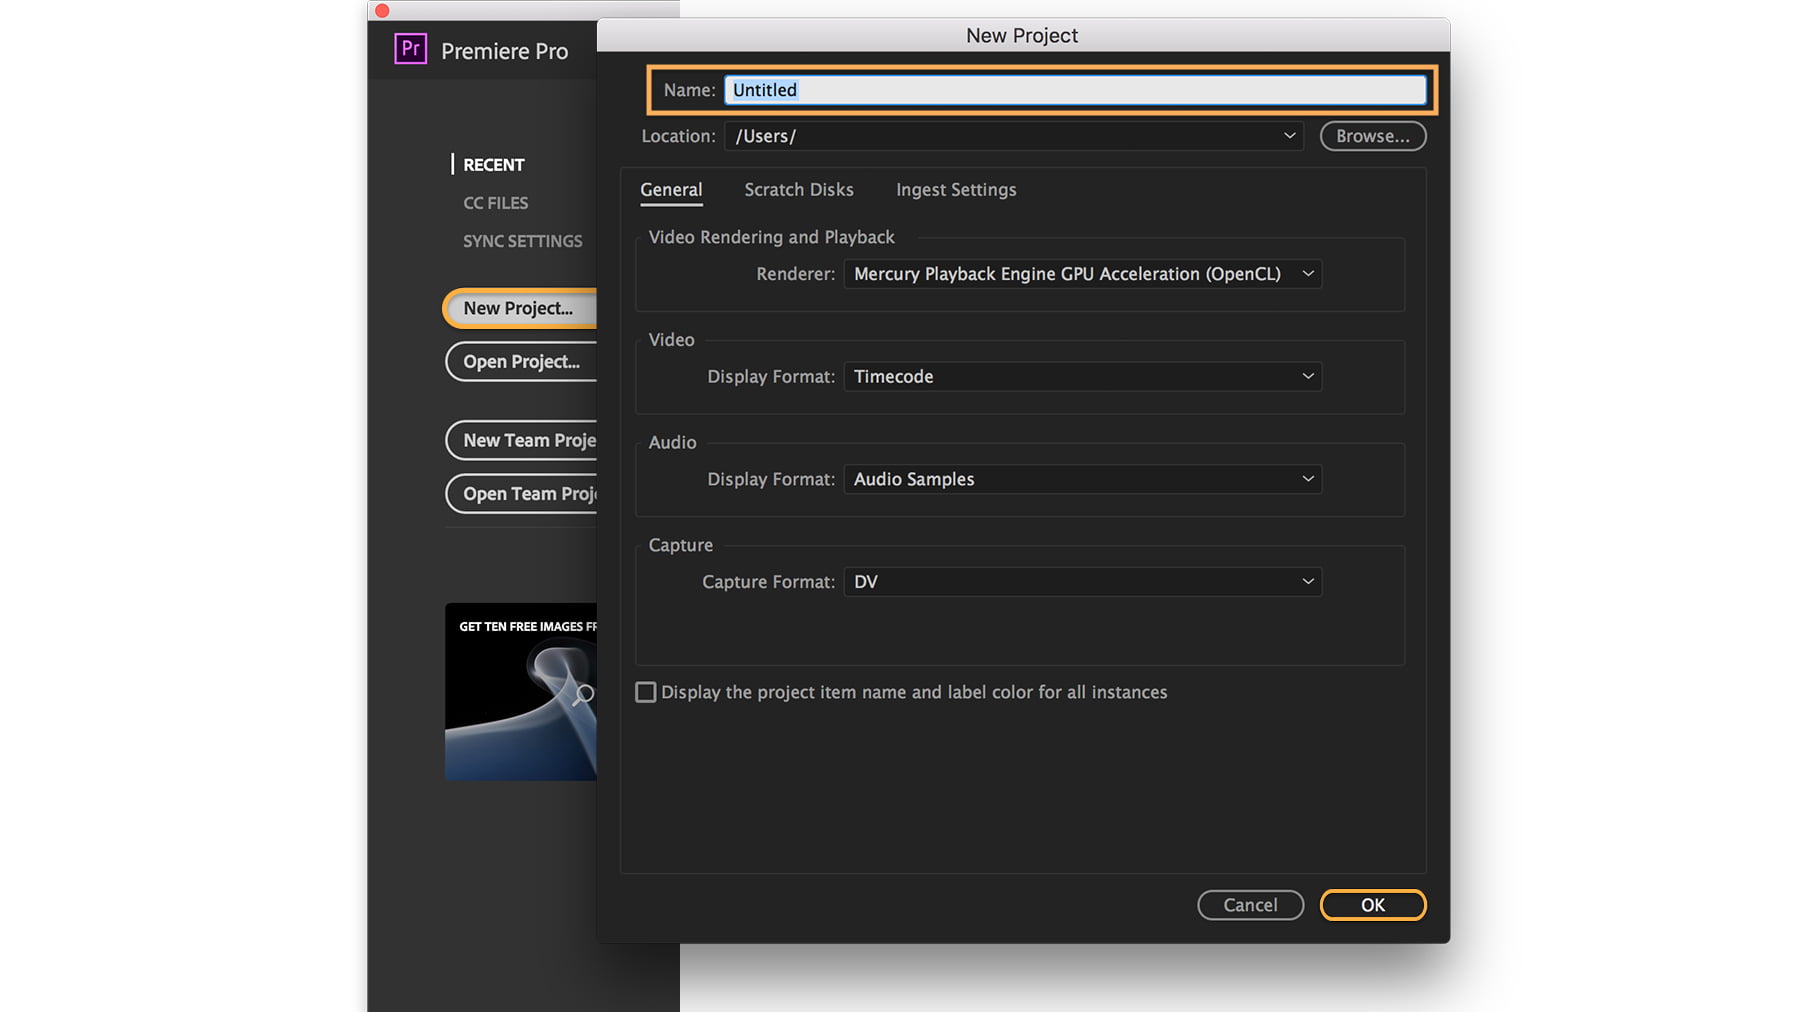
Starting a new project in Adobe Teams
- Launch Premiere Pro then click New Project on the Start screen or choose File > New > Project from the main menu
- In the New Project dialog box, name your project and click Browse to choose where you want to save it.
- Click OK when you’re done

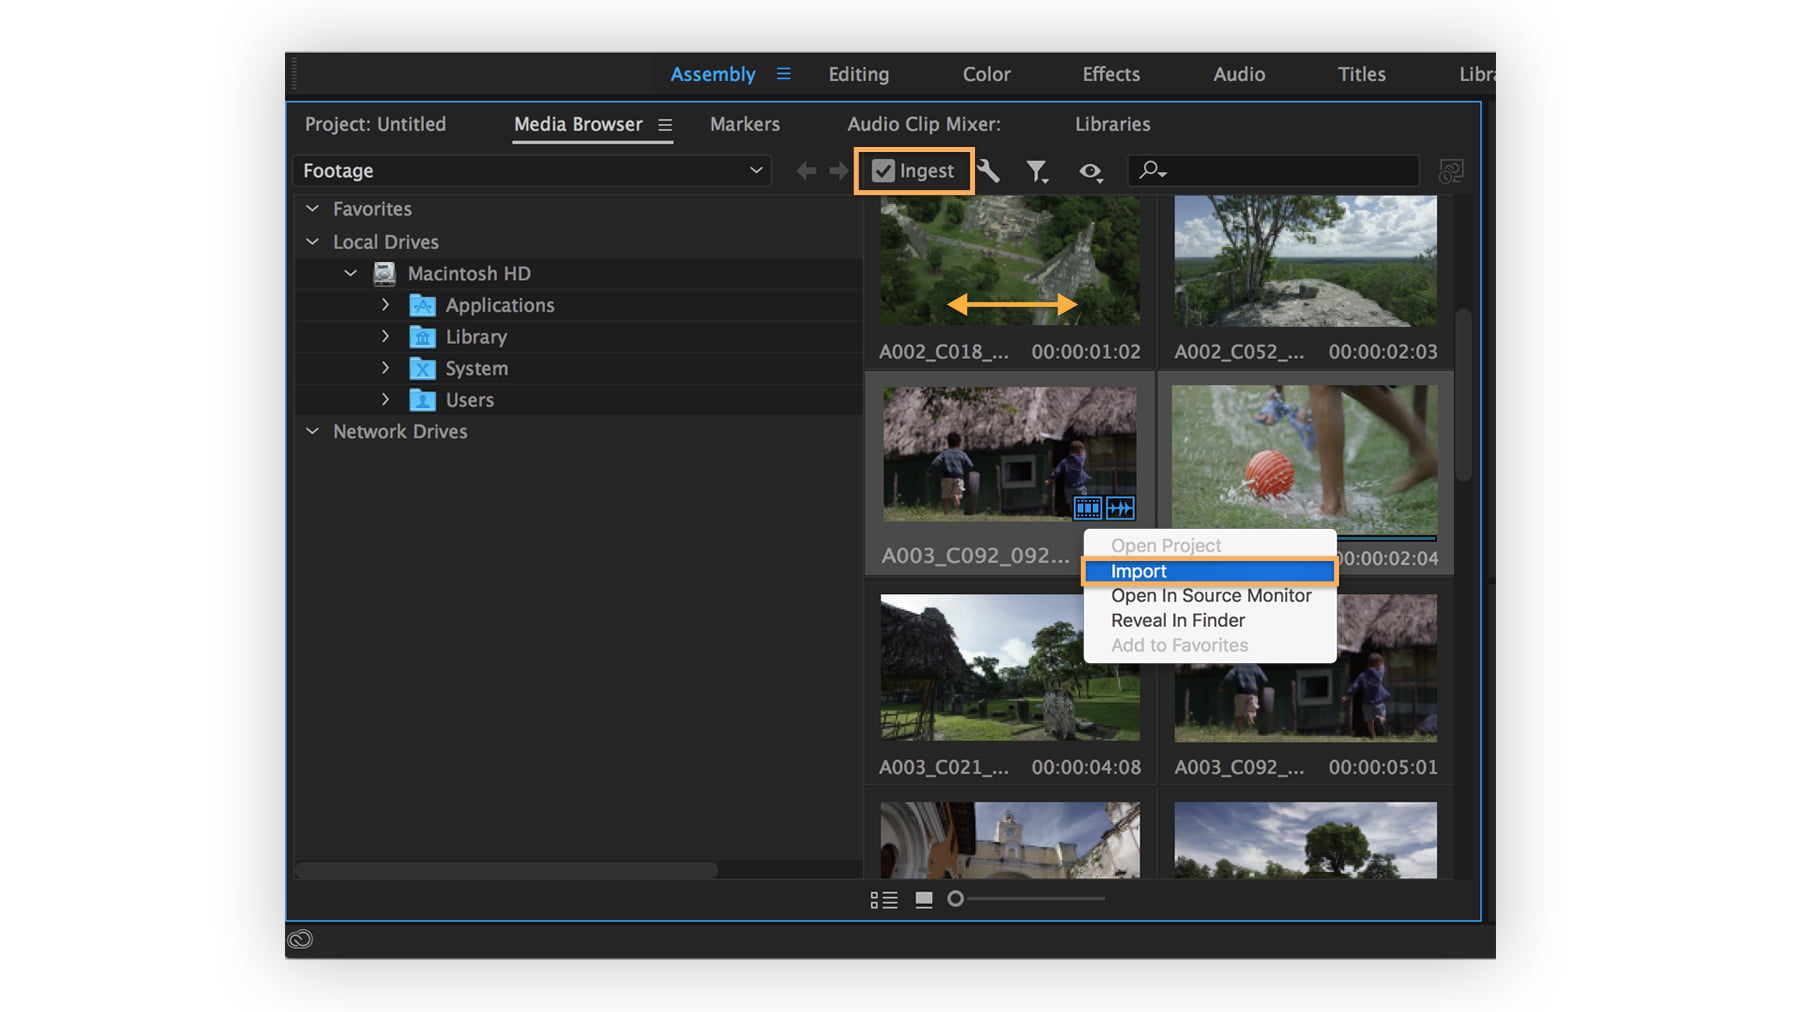
Importing your media
Before you import your footage, click the Ingest box at the top of the panel to have Premiere Pro save a copy of your files on your local drive. Otherwise, Premiere Pro will simply link to wherever your files are currently stored. For large projects containing high-resolution media files, it’s a good idea to save your imported media to a dedicated storage drive so you won’t unexpectedly fill up your hard drive.

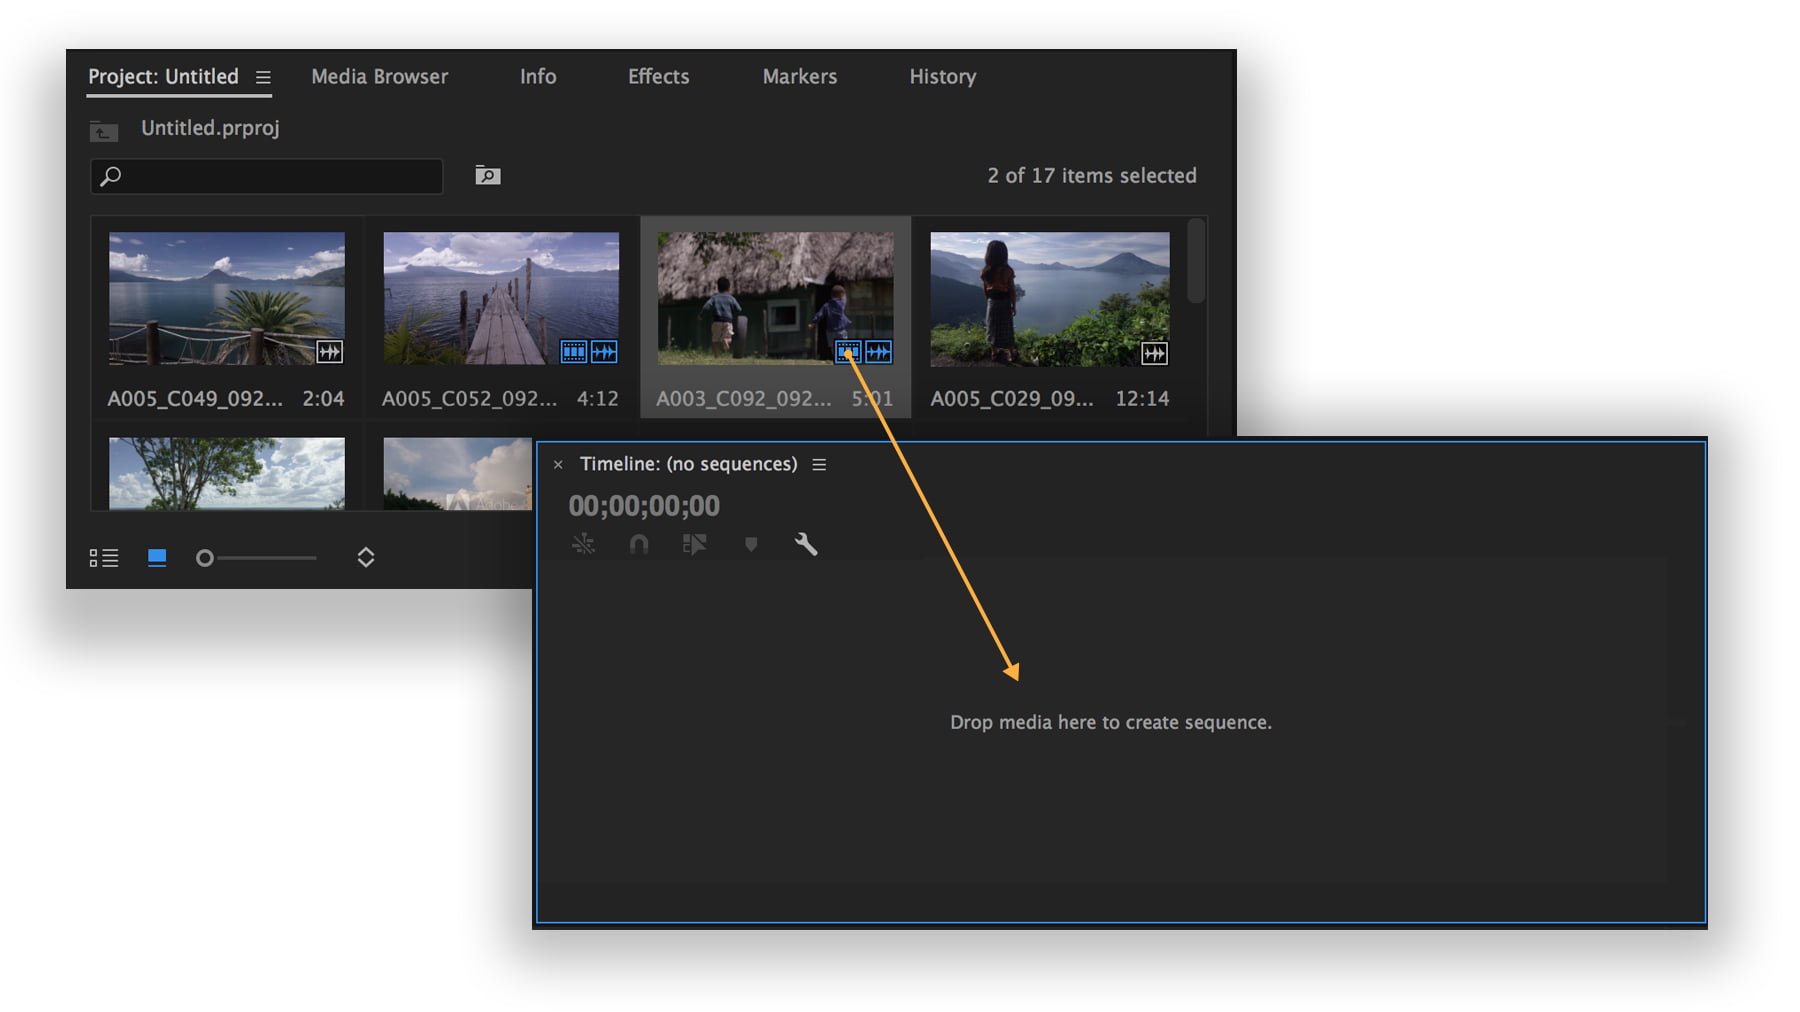
Create a sequence of clips
Switch to the Editing workspace by selecting Editing at the top of the screen or by choosing Window > Workspaces > Editing. Your imported footage now appears in the Project panel. If you don’t see the Project panel, choose Window > Project. Your files may appear in a list; to see thumbnails instead, click the thumbnail view icon at the bottom of the panel. Select the first video clip you want to appear in your sequence and drag it from the Project panel to the empty Timeline panel (choose Window > Timeline if it’s not visible).

Save Color and Effects for the End
Another solid, quick tip in managing remote edits is to always try to save both color correction and grading for the very end. Try to hold off on the majority of your motion graphics, effects, and animations as well. Reserve the first stage of your video editing project for working with ungraded rough drafts until you can get a picture lock. Only then should you start on your colors and effects.
Dropbox, another great resource for cloud based editing, is the place for your team’s content to come together. It is famous for file management and file handling practices.
Dropbox makes it easy to synchronize files between your devices. When you synchronize your computer folder with Dropbox, that folder’s data will be available to an online video editor and offline editing. Which means you can download files even when all of your other devices are offline or turned off.
- Blackbird – https://www.blackbird.video/ – remote production teams can access video fast from any laptop, making it immediately available worldwide.” One of the worlds fastest cloud video editing publishing platforms.
- Frame.io – https://frame.io/ – an online platform for video post production collaboration. The tool set makes it easy to privately and securely upload, review, and share video with teams using annotations, threaded comments, and tagging
- Wipster – https://wipster.io/ – Wipster is a cloud-based platform for reviewing, approving, and collaborating on video production projects. Wipster helps bring together distributed teams to collaborate on digital media projects in a very effective way.
Do you have questions about our recent news or upcoming events? Let us know.
Learn How