Three Point Lighting
Three point lighting is the staple of interview-style lighting. The three “points” in this style of lighting are key, fill, and backlight. Before lighting setup, the space must be examined. The space must be adequately sized to bare your lighting equipment setup. Space behind the subject is also needed for three point lighting.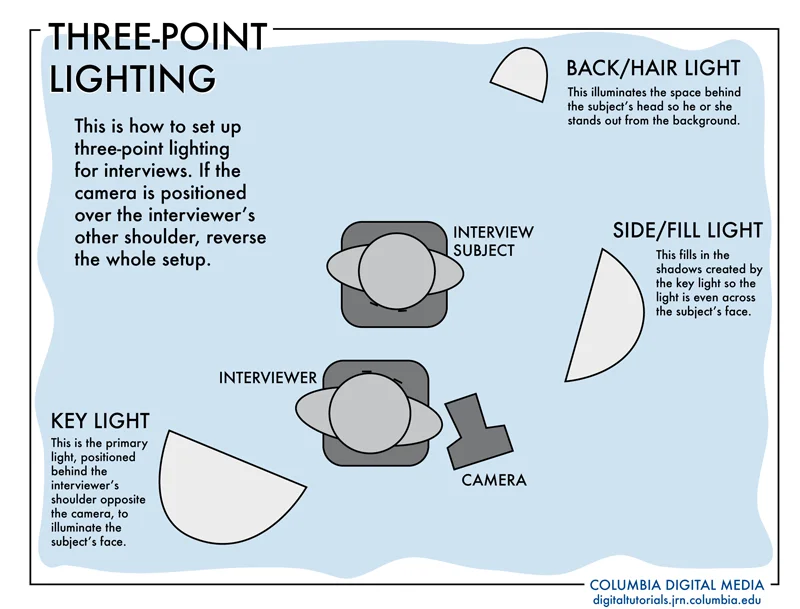
The Key Light
The key is the primary and most important light as it provides most of your subject’s lighting. The key is placed about 45 degrees to the subject’s right or left and about 45 degrees above, aimed straight at the face. The 45-degree angle is simply a starting point. Feel free to adjust it as necessary. The key doesn’t have to be extremely bright. The directionality is more important. Strong shadows and good tonal range should be present. Move the key back to cut down the light emitted.
The Fill Light
The fill light is placed opposite the key and at camera height. The purpose of this light is to fill in the shadows created by the key light, preventing them from getting too dark. The fill light should not create a second shadow. If there are two shadows, that means the fill light is too powerful and needs to be reduced. The fill can be softened by changing the power setting, moving it back, or using a diffuser. Try your fill light at an angle of 15 or 25 degrees, and adjust it to suit your aesthetic.
Don’t have a fill light? No problem. Use reflectors or white foam boards to bounce key light back towards the subject and into the shadows. Use any reflective material to accomplish this. Be mindful that the material shouldn’t introduce any color into the shadow or reflect too much light. If using a reflector, you might need to get pretty close to the subject without letting it show in the frame.
The Back Light
The back light illuminates lights the space above and slightly behind the model. Place the light above their head and behind them so it points about 45 degrees down toward their hair and back. Its purpose is to give some sense of separation between the model and the background. Barn doors are useful in controlling the direction of this light. Use a scrim to reduce the lights intensity or any combination of a dimmer and diffusion paper.
Practice three point lighting to master its traditional use. Experiment with three point lighting to discover new variations.
Click here to view a demonstration of three-point lighting.
Resources:
Cassidy, K. (2008 May 1). THREE-POINT LIGHTING 101. [Videomaker]. Retrieved from http://www.videomaker.com/article/13531-three-point-lighting-101
Hyman, I. Three Point Lighting: Learn How to Use the Key, Fill, and Back Lights. [Blog post]. Retrieved from http://www.izzyvideo.com/three-point-lighting/
Images:
http://digitaltutorials.jrn.columbia.edu/wp-content/uploads/2010/11/lighting.png
Do you have questions about our recent news or upcoming events? Let us know.
Learn How